1. Conduct a Site Assessment
A professional installer will evaluate roof orientation, shading, structural integrity, and local climate. Using tools like LIDAR‑based solar mapping, they can generate a precise production forecast. DIY assessments often miss subtle shading from nearby trees, which can shave 15‑20 % off expected output.
2. Size Your System Correctly
Calculate daily energy consumption (kWh) from utility bills, then factor in desired autonomy days (usually 1‑2 days for residential, up to 5 days for critical facilities). For instance, a household using 30 kWh per day and aiming for two days of backup would need a 60 kWh battery, but most homeowners opt for a 12‑20 kWh solution to balance cost and space.
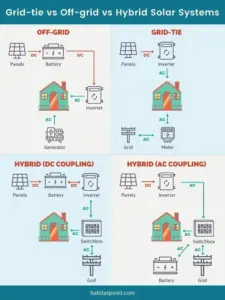
3. Choose the Right Inverter and Monitoring Platform
Hybrid inverters, such as those highlighted in Buy Solar Panel Installation with Advanced Inverter Technology Today – Boost ROI & Future‑Proof Your Energy, seamlessly manage power flow between panels, battery, and the grid, while providing real‑time analytics via a cloud dashboard. This transparency helps you optimise discharge cycles and extend battery life.
Table of Contents
- 1. Conduct a Site Assessment
- 2. Size Your System Correctly
- 3. Choose the Right Inverter and Monitoring Platform
- 4. Review Permitting and Interconnection Agreements
- 5. Finalise the Contract and Schedule Installation
- 6. Commissioning and Post‑Installation Monitoring
- Common Pitfalls and How to Avoid Them
- Real‑World Success Stories
4. Review Permitting and Interconnection Agreements
Most jurisdictions require a building permit and a net‑metering agreement. Some utilities now offer “grid‑support” contracts that reward customers for supplying stored energy back to the grid during peak times, effectively turning your battery into an additional revenue stream.
5. Finalise the Contract and Schedule Installation
Professional installers typically provide a turnkey service: design, procurement, permitting, installation, and commissioning. Ensure the contract includes performance guarantees for both the PV array (e.g., 80 % output after 25 years) and the battery (e.g., 80 % capacity after 10 years).
6. Commissioning and Post‑Installation Monitoring
After the system goes live, the installer should walk you through the monitoring portal, teach you how to set custom discharge schedules, and explain safety procedures for battery maintenance.
Common Pitfalls and How to Avoid Them
- Undersizing the battery: A small battery may never be fully utilized, reducing the economic benefit. Conduct a detailed load‑profile analysis before finalising capacity.
- Neglecting inverter compatibility: Pairing a low‑efficiency inverter with a high‑performance array can cause clipping losses. Opt for an inverter rated for at least 110 % of your array’s peak output.
- Skipping professional installation: DIY projects often overlook critical safety codes, such as fire‑rating requirements for battery enclosures. Professional installers adhere to NEC 2023 standards for battery storage systems.
- Ignoring future expansion: Choose a system with modular battery racks so you can add capacity as your energy needs evolve.
Real‑World Success Stories

Case Study 1 – Suburban Family Home